
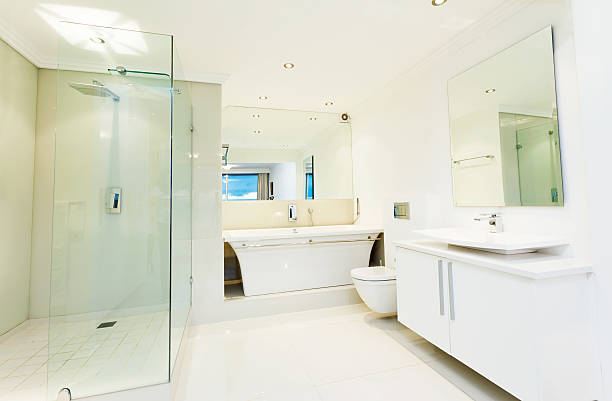
The bathroom is no longer just a functional utility room; it has evolved into a sanctuary of relaxation and personal expression. At the heart of this transformation lies the vanity. While big-box retailers offer endless “off-the-shelf” options, they often fall short in terms of material quality, specific dimensions, or unique aesthetic flair.
Building your own furniture using professional bathroom vanity plans allows you to reclaim your space. Whether you are a weekend warrior with a circular saw or a seasoned woodworker with a dedicated shop, crafting a custom vanity ensures that every inch of your bathroom is utilized efficiently while reflecting your personal style.
In this comprehensive guide, we will dive deep into the world of DIY cabinetry, covering everything from initial design theory to the final coat of water-resistant finish.
Why Choose DIY Bathroom Vanity Plans?
Before sawdust starts flying, it is important to understand the value proposition of building versus buying.
1. Superior Material Quality
Most commercial vanities in the mid-to-low price range are constructed from particle board or medium-density fiberboard (MDF) with a thin veneer. In a high-moisture environment like a bathroom, these materials can swell and degrade over time. By following custom plans, you can opt for furniture-grade plywood, solid hardwoods (like Oak, Walnut, or Maple), and high-quality hardware that will last a lifetime.
2. Perfect Dimensional Fit
Bathrooms—especially in older homes—rarely feature perfectly square walls or standard alcove sizes. A DIY approach allows you to build a “wall-to-wall” vanity or a “floating” unit that fits your specific plumbing layout without the need for awkward filler strips.
3. Cost-Effectiveness
While high-quality lumber isn’t cheap, you are eliminating the massive retail markup and shipping costs associated with heavy furniture. You can often build a professional-grade solid wood vanity for the same price as a high-end “flat-pack” unit.
Understanding Vanity Anatomy and Standard Dimensions
Before selecting a specific set of bathroom vanity plans, you must understand the “standard” constraints of bathroom ergonomics. While custom building allows for flexibility, straying too far from standard dimensions can affect comfort and resale value.
Key Dimensions Table
| Feature | Standard Dimension | Notes |
| Standard Height | 30″ – 32″ | Common in older homes or kid’s bathrooms. |
| Comfort Height | 34″ – 36″ | The modern standard; mimics kitchen counter height. |
| Standard Depth | 21″ | Allows for a 22″ countertop (1″ overhang). |
| Small Space Depth | 16″ – 18″ | Ideal for powder rooms or narrow passages. |
| Width (Single) | 24″, 30″, 36″, 48″ | Most common sizes for single-sink units. |
| Width (Double) | 60″, 72″ | Minimum 60″ required for two sinks to avoid elbow bumping. |
Popular Styles of Bathroom Vanities
Your choice of plans will largely depend on the architectural style of your home. Here are the three most sought-after designs in the current market:
1. The Farmhouse/Rustic Vanity
Characterized by “X” braces on the sides, chunky legs, and often finished with a distressed paint or dark stain. These plans usually utilize pocket-hole joinery, making them very accessible for beginners.
2. The Modern Floating Vanity
Wall-mounted units create an illusion of space by exposing the floor beneath. These require advanced anchoring techniques and a sturdy internal frame to support the weight of a stone countertop and a full sink.
3. The Mid-Century Modern (MCM) Vanity
Tapered “splayed” legs, clean lines, and the use of warm woods like Teak or Walnut. MCM plans focus on minimalism and often incorporate “inset” drawers for a sleek, flush look.
Essential Tools and Materials
To execute high-quality bathroom vanity plans, you need a baseline of tools. You don’t need a $10,000 shop, but accuracy is paramount in cabinetry.
The Tool Checklist
- Table Saw or Circular Saw with a Track: For breaking down large plywood sheets.
- Miter Saw: For clean, square cuts on face frames and legs.
- Pocket Hole Jig (e.g., Kreg): The “secret weapon” for fast, strong DIY joinery.
- Drill and Impact Driver: For assembly.
- Clamps: You can never have too many. Parallel clamps are best for keeping carcasses square.
- Level and Stud Finder: Critical for the installation phase.
Material Selection
Pro Tip: Always use Formaldehyde-free PureBond Plywood or exterior-grade plywood for bathroom projects. The moisture resistance is superior to standard interior ply.
- Carcass: 3/4″ Plywood is the industry standard for the box.
- Back Panel: 1/4″ or 1/2″ Plywood to provide lateral stability.
- Face Frames: Solid hardwood (1×2 or 1×3 boards).
- Edge Banding: If not using face frames, use iron-on veneer edging to hide the plywood plys.
Planning and Layout
Every successful build starts with a drawing. When looking at your bathroom vanity plans, check for the following “hidden” factors:
Plumbing Alignment
Before you cut wood, locate your P-trap and shut-off valves. Nothing is more frustrating than building a beautiful set of drawers only to realize the plumbing pipe runs right through the middle of the top drawer.
- Center-set plumbing: Drawers usually go on the left and right.
- Off-set plumbing: Drawers go on one side, and a large cabinet door goes under the sink.
The “Toe Kick” Space
A standard vanity has a recessed space at the bottom (usually 3″ to 4″ deep and 4″ high). This allows you to stand close to the mirror without hitting your toes against the base of the cabinet. If you are building a furniture-style vanity with legs, the toe kick is replaced by the open space beneath.
Step-By-Step: Building a Basic Shaker-Style Vanity
In this section, we will walk through the foundational steps common to most bathroom vanity plans.
Step 1: Breaking Down the Plywood
Start by cutting your side panels. For a comfort-height vanity (34.5″ without the top), you will typically cut two panels at 21″ wide by 34.5″ high. If you are incorporating a built-in toe kick, you will notch out the bottom corner at this stage.
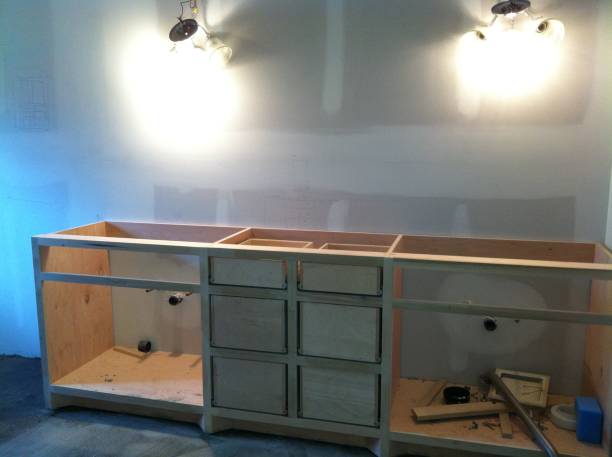
Step 2: Joining the Carcass
Using a pocket hole jig, drill holes into the top and bottom stretchers (the horizontal supports). Connect the side panels using wood glue and 1-1/4″ pocket screws.
- Accuracy Check: Measure diagonally from corner to corner. If the measurements are identical, your box is perfectly square.
Step 3: Adding the Back Support
While some plans use a full back panel, many professional builders prefer a “picture frame” support system. This leaves the back mostly open, making it significantly easier to slide the vanity over existing plumbing during installation.
Mastering the Face Frame and Doors
The face frame is essentially the “skeleton” of your vanity that the viewer sees. It covers the raw edges of the plywood carcass and provides the structural mounting point for doors and drawer fronts.
1. Constructing the Face Frame
Most bathroom vanity plans utilize 1×2 solid hardwood (which actually measures 3/4″ x 1-1/2″).
- The Stiles: These are the vertical pieces.
- The Rails: These are the horizontal pieces.
To ensure a seamless look, use pocket hole joinery on the back side of the frame so no screws are visible from the front. Always use a dedicated face-frame clamp to ensure the joints are perfectly flush. A 1/32″ offset can cause significant headaches when it comes time to sand and paint.
2. Door Styles: Inset vs. Overlay
Deciding on your door style is a pivotal moment in your build process.
- Partial Overlay: The door sits on the frame and covers part of it. This is the most “forgiving” style for beginners because the gaps (reveals) don’t have to be microscopic.
- Full Overlay: The doors cover the entire face frame for a modern, seamless look.
- Inset Doors: The doors sit inside the frame. This is the hallmark of high-end custom cabinetry but requires extreme precision. If your vanity box is even slightly out of square, inset doors will bind.
3. Building Shaker Doors
Shaker doors are a staple of modern bathroom vanity plans because they are timeless and relatively simple to build. They consist of a frame (stiles and rails) and a recessed center panel. You can create the “groove” for the panel using a table saw or a router table.
Drawer Boxes and Slide Hardware
Drawers are often the most intimidating part of a furniture build, but they are essential for maximizing bathroom storage for toiletries and linens.
Choosing the Right Slides
Don’t skimp here. The bathroom environment involves frequent use.
- Side-Mount Slides: Visible when the drawer is open, but easy to install and very durable.
- Undermount Soft-Close Slides: These are hidden beneath the drawer box, providing a high-end look and a “vacuum-sealed” closing feel.
The “U-Shaped” Drawer Secret
If your bathroom vanity plans include a drawer directly under the sink, you don’t have to lose that storage. Professional builders create a “U-shaped” drawer box that wraps around the P-trap. This allows you to store small items like sponges or brushes in a space that is usually wasted.
Sanding, Prepping, and Finishing
In a bathroom, the finish isn’t just about aesthetics; it’s about survival. Steam from showers and splashes from the sink will destroy an unprotected wood surface.
1. The Sanding Schedule
Never skip grits. For a professional finish, follow this sequence:
- 80 Grit: To remove glue squeeze-out and level joints.
- 120 Grit: To remove the scratches from the 80 grit.
- 180 Grit: The final stage for most hardwoods.
- 220 Grit: Only if you are using a very dark stain or a high-gloss paint.
2. Priming for Success
If you are painting your vanity, use an oil-based or shellac-based primer (like Zinsser BIN). Water-based primers can cause the wood grain to “raise,” resulting in a fuzzy texture, and they don’t block tannins as effectively as oil-based options.
3. Topcoats: Protecting from Moisture
For stained vanities, look for “Conversion Varnish” or a “Marine-Grade Spar Urethane.” These are designed to withstand high humidity. If you prefer a DIY-friendly option, a high-quality water-based Polyurethane (like General Finishes High Performance) works well if you apply at least 3–4 thin coats.
Countertops and Sink Integration
Your bathroom vanity plans are not complete until you consider the weight of the top.
Countertop Material Weights
| Material | Weight per Sq. Ft. (approx.) | Structural Requirement |
| Laminate | 1.5 lbs | Standard Plywood Carcass |
| Quartz (3cm) | 15–18 lbs | Reinforced corners/stretchers |
| Granite (3cm) | 18–20 lbs | Heavy-duty framing required |
| Concrete (Custom) | 20+ lbs | Vertical support pillars recommended |
Mounting the Sink
- Drop-In Sinks: The easiest for DIYers. The sink “lip” sits on top of the counter, hiding the cut.
- Undermount Sinks: Require a polished edge on the countertop (usually professionally done) and are glued to the underside of the stone.
Installation: The Final Hurdle
Even the best-built vanity will look poor if it isn’t installed level. Most bathroom floors are sloped toward a drain or are simply uneven due to settling.
1. Finding the High Point
Use a long level to find the highest point of the floor where the vanity will sit. Start your installation there and use plastic shims to bring the rest of the unit up to level.
2. Securing to Studs
Never rely on drywall anchors. A vanity topped with stone can weigh over 200 lbs. Use 3″ cabinet screws to go through the back support rail of your vanity directly into at least two wall studs.
3. Scribing to the Wall
If your vanity sits flush against a side wall (an “alcove” installation), you will likely have a gap because walls are rarely plumb. Professional bathroom vanity plans include a “scribe strip”—a thin piece of matching wood that you can shave down to match the exact contour of your wall for a seamless, built-in look.
Summary of the Build Process
Building a vanity is a marathon, not a sprint. By breaking the project down into the Carcass, the Face Frame, the Drawers, and the Finish, you can manage the complexity without feeling overwhelmed.
- Week 1: Finalize plans and source lumber.
- Week 2: Cut and assemble the carcass and face frame.
- Week 3: Build drawer boxes and door panels.
- Week 4: Sanding and the first 2 coats of finish.
- Week 5: Final assembly, hardware installation, and plumbing.